Runway Inspired Challenge ric#32 - Moschino Cheap and Chic

Monday, March 25, 2013

Howdy! I'm here to share with you a card I made for the current Runway Inspired Challenge. I love the color combination of the model's outfit, so I had to take a stab at this one ;)


While cleaning up my craft table to make some room for stamping, I found a package of silver glitter tape that I hadn't used yet! It was perfect for this challenge.

Using the largest lattice stamp from Uniko Studio Background Builders: Lattice stamp set, I stamped a pattern with black ink. For added color, I stamped the large solid lattice stamp inside the outlines, leaving one blank for the Thank You sentiment. Three black rhinestones in the corner along with the silver glitter strip at the bottom give it a special finishing touch! A very easy and quick card to make.


If you like this inspiration photo and colors as much as I do, there's still plenty of time to join in on the challenge (deadline for entries is Friday, March 29th at midnight)!

Supplies:
Stamps: Uniko Studio - Background Basics: Lattice; Label Love: Thank You
Cardstock: PTI - White; SU - Basic Black
Ink: Staz-On - Black; SU - Rose Red
Other: Silver Glitter tape & Rhinestones - Recollections; Dimensionals

Uniko Studio Blog Hop & CAS-ual Fridays CFC93

Monday, March 11, 2013

Hello! Welcome to another Uniko Studio Blog Hop. This month, we are revisiting a stamp set that was released last year: Background Basics-Lattice. You can purchase the set from Uniko's website. Below is an image of all the pieces in the set. It's a super fun set to have, and so trendy!! Make sure to read through to the end of the post to see how you can have a chance to win it AND the Modern Lattice Digital Patterned Paper Collection!


I chose to use rainbow colors and stamp the Lattice pattern repeatedly. I was so surprised at how EASY it was to line up that stamp -- such a benefit of clear stamps! I added small blocks of coordinating cardstock to the card base, then adhered the stamped cardstock piece over it. It needed a little something more, and I think those buttons were just the right thing! I am also entering this card in the CAS-ual Fridays CFC93 Challenge: Color Blocks.


Now, on to the details of the giveaway. All you need to do is hop along and leave a comment on the designers' blogs by midnight Wednesday, March 13th GMT! That means you have up to EIGHT chances to enter! So hop on over to the Uniko Studio blog if you are just starting out, or continue onto Ren-Yi's blog if you've already started the hop.

Uniko Studio
Aimes
Amber
Erika
Gayatri
Nicki -------THAT'S ME!
Ren-Yi
Stacey

Supplies:
Stamps: Uniko Studio - Background Basics: Lattice; Label Love: Birthday
Cardstock: PTI - White

PTI MIM #105 - Glitter Trim

Sunday, March 3, 2013

I LOVE Papertrey Ink. Stamps, cardstock, embellishments, everything. I just can't get enough. It just makes me SOOOOO happy! Ok, ok, enough of that. On to my card for this challenge.

Glitter trim is this week's theme. Sure, I love glitter, but I don't use it very much because I just hate the mess it creates! Are you with me?! I typically go the easy route and use Stickles to add some sparkle when I want. But, I thought I'd break out the 'ol glitter to use for this Make it Monday.

I don't have a Xyron sticker machine (like Dawn McVey demonstrated in the video), so I just used old fashioned glue on a piece of die cut cardstock, and sprinkled the glitter on as fast as I could so it would stick well. After drying, I still noticed quite a bit of glitter flaking off (enough to be annoying), so I decided to try spraying the piece with hairspray to set it. HOLY COW! It TOTALLY worked!!! Although it took some time to dry (the piece of cardstock became pretty saturated), the glitter really set in place, and the cardstock stiffened up nicely! Anyway, just wanted to share that in case anyone else has been just as frustrated when using regular glitter :)


Last week was also the Monogram Blog Hop, but I just didn't get around to making a project for it, but REALLY wanted to. So, I decided to incorporate it in this week's MIM. I used Fancy Folk art to create the pattern around the negative die cut "n" monogram. Here's how I did it:
  • Die cut the letter first
  • Use a circle die cut shape to trace around the letter using a pencil (or anything else circular in shape)
  • Using a ruler and pencil, draw a horizontal and a vertical line through the center of the circle to use as your stamping guide
  • Stamp the black outlines first, on the horizontal & vertical axis, then fill in the spaces between those. Continue stamping the inside of the flowers.
I absolutely LOVE the Fancy Folk Art set! Can't wait to use it more! I appreciate you stopping by, and would be so grateful to hear your feedback!

Supplies
Stamps: PTI - Fancy Folk Art
Cardstock: PTI - White; Stampin' Up! - Pale Plum
Ink: Stampin' Up! -Baja Breeze, So Saffron, Pale Plum; Staz-on: Jet Black
Other: Scallop Die Cut - PTI; "n" Die Cut - PTI; Glitter - PK Glitz: Sand

PTI Design Team Favorites Inspiration

Thursday, February 14, 2013

I'm back again! I know, two posts in one day is totally not my norm, but I just had to get a project done for the Papertrey Ink Design Team Favorites Inspiration Contest/Challenge before the deadline!

One of my favorite all-time, paper-crafting idols, who I admire so so much (and am secretly hoping to meet someday since we're both from the Chicago area), is Christina Kowalczyk. Her style is graphic, clean and simple. I think my style for the most part has evolved as a clean and simple style. Christina's artwork has been quite the source of inspiration for me, and I was thrilled when she joined the Papertrey Ink Design Team last year.


The goal for this is to use one of the designers' favorite cards from the past year and use it for inspiration for our own project. I couldn't decide which to use, so I combined ideas from two (the top two in the photo above). I used a gradient, like the first card, but stacked the Square Prints set like the second card. I felt it needed some more dimension or texture, so I added the large purple button in the center. Can I just say I LOVE the end result!!! I love challenges like these because it makes me think so differently and I come up with things that I probably would have NEVER done otherwise! I'd love to hear your feedback on this one ;) Thanks for stopping by for a visit!

Valentine's Cards and More Valentine's Cards

I have a few more Valentine's Day cards to share with you. Like I said in my previous post, I could make Valentine's/heart cards all year long!

I decided to make some cards to send to Grandparents and an Aunt. No, I'm not talking about MY Grandparents or MY Aunt, but to my unborn babies' grandparents and aunt!! I haven't made this news public here on the blog yet, so I thought this would be a good chance to do so. My husband and I are expecting twin boys this spring! So I thought it would be cute to send V-day cards from them to our family (this explains the 'be my valentine' stamped twice)!

For all of these, I used the Papertrey Ink set Heart 2 Heart #3, and the sentiment is from the Fillable Frames #11 set. Enjoy, and hope you had a wonderful Valentine's Day with your loved ones!


All You Need is Love - Valentine's Card

Tuesday, February 12, 2013

Just popping in real quick to share a lovey dovey Valentine's card. This is my FAVORITE holiday to create cards for....I can't get enough of hearts ;)

I used a PTI set called Heart 2 Heart #3, and the sentiment is from the Fillable Frames #11 set. I hope you can find some inspiration from my CAS card!


Supplies
Stamps: PTI - Heart 2 Heart #3, Fillable Frames #11 (sentiment)
Cardstock: PTI - White; Stampin' Up! - Cherry Cobbler, Kraft
Ink: Stampin' Up! - Cherry Cobbler; PTI - Classic Kraft
Other: Button - PTI; Sew Easy Tool & Embroidery Floss

Uniko Studio February Release & Blog Hop!

Monday, February 11, 2013

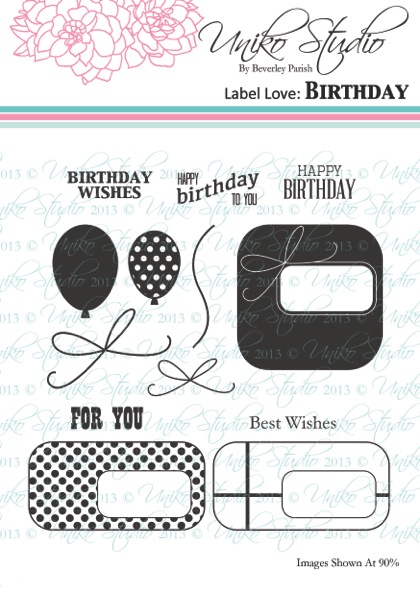
Good morning stampers! It's already time for a new release from Uniko Studio! I am showcasing two stamp sets today. The first is called Label Love: Birthday, and whatdya know, it's Uniko's first birthday today. The second is called Bright Butterflies. Make sure to read all the way down to the end of the post to find out how to enter for a chance to win the ENTIRE February 2013 Release! WOO!


The first card above is pretty self-explanatory. The second one uses both the solid and the polka dotted balloons. I stamped the kraft colored balloons first, leaving the bottom portion of the balloon cut off. Then the polka dotted ones were stamped on top. I wanted to just create a fun pattern that didn't necessarily look like balloons, and with the colors I used, it turned out kinda looking like Easter eggs, LOL! Oh well, I still like it. The top cardstock panel is popped up with dimensionals and a small strip of patterned paper is peeking out at the bottom.


The butterflies are heat embossed with white EP, and then I inked a sponge with teal ink and applied it to the white cardstock, leaving it to fade slightly at the bottom so the sentiment could pop on the white background. I added small black rhinestones on either side of the sentiment.

Along with the two clear stamp sets being released this month, there are FOUR new digital paper collections available as well! They include: Big Birthday Wishes, Bright Butterflies Additions collection, Classics Spring, and Eclectic Mix Spring. See the images below!


I hope you enjoyed my samples using the new goodies ;) Now, on to the details of the giveaway. All you need to do is participate in the Blog Hop and leave a comment on the designers' blogs! That means you have up to TEN chances to enter! So hop on over to the Uniko Studio blog if you are just starting out, or continue onto Ren-Yi's blog if you've already started the hop.

Uniko Studio
Aimes
Amber
Erika
Gayatri
Kerri
Nicki -------THAT'S ME!
Ren-Yi
Stacey
Feb Guest Designer - Deborah Frings

Supplies:
Striped Birthday
Stamps: Uniko Studio - Label Love: Birthday
Cardstock: PTI - Rustic White
Patterned Paper: Cosmo Cricket - Salt Air
Ink: SU - Sage Shadow, Groovy Guava
Other: Spellbinders Large Labels Die; Stampin' Up! Stripes Embossing Folder; Dimensionals

Pastel CAS Birthday
Stamps: Uniko Studio - Label Love: Birthday
Cardstock: PTI - White
Patterned Paper: Jillibean Soup - Blossom Soup
Ink: SU - Baja Breeze, Regal Rose, Lavender Lace; PTI - Classic Kraft
Other: Dimensionals

Teal and Black Butterflies
Stamps: Uniko Studio - Bright Butterflies
Cardstock: Stampin' Up - Basic Black; PTI - White
Ink: SU - Taken with Teal; Staz-On Jet Black
Other: Sweet Stamps - White Embossing Powder; Black Rhinestones; Dimensionals

Papertrey Ink Blog Hop: Black Backgrounds

Friday, January 25, 2013


Hello and thanks for stopping by for the Papertrey Ink Blog Hop! I was really pumped about this hop when I saw the post about using Black Backgrounds and seeing all the gorgeous samples Nichole Heady posted on her blog. I made it a point to MAKE TIME to create a project for this. Sometimes we just have to do that, or we'll never get to it, right?!

So here it is, my take on a technique called Black Magic. I watched this video, and it really is super easy. All it really is is stamping with White craft ink on black cardstock, and once dried, just color in with colored pencils! I used one element from the Mat Stack 5 Collection to create the frame shape. The center flower is stamped in White ink on black cardstock and popped up using foam tape. For added interest, I added small dots of Liquid Pearls to the stamped images. The ribbon is the PTI silk ribbon (sorry for the horrid photo....not sure why the white is so washed out!).

Happy Stamping!!


Supplies
Stamps: PTI - Mat Stack 5 Collection
Cardstock: Stampin' Up! - Basic Black
Ink: Stampin' Up! - Whisper White Craft Ink
Other: Silk Ribbon - PTI; Colored Pencils; Liquid Pearls
 
FREE BLOGGER TEMPLATE BY DESIGNER BLOGS